
Descaling removes scale buildup from the inside of cast iron pipe using a rotating chain knocker driven down the line on a flexible shaft. It smooths out the pipe, restoring flow — but just as importantly, it exposes the pipe wall so you can actually see what condition the pipe is in.
Two things decide whether a descale goes well: chain size and speed. Sized correctly, descaling will not damage sound pipe. Sized too large, it can damage pipe that's already compromised, and it makes your machine work harder for a worse result. Speed then determines how aggressive that chain size actually behaves in the pipe.
Descaling is a diagnostic process, not just a cleaning job
Most descaling gets described as removal — get the scale off the wall, restore the diameter, move on. That's half of it.
Scale hides everything. You cannot assess a pipe you cannot see. Every crack, every soft spot, every section that's lost wall thickness is buried under buildup until you take it off. So the descale is how you find out what you're actually dealing with.
That reframes the job into two questions you answer in sequence:
- Will this pipe hold up to a descale?
- Now that I can see it — what does it need?
A camera inspection before you start answers the first. A second inspection after your initial pass answers the second. If the pipe is sound, you clean it, flush it, and you're done. If it isn't, you now have the information to recommend lining or another repair — and the evidence to show the customer why.
That's a stronger position to quote from than a guess.
Why chain size and speed decide the job
Chain knockers work by flaring outward under rotation. The chain wants to open to whatever diameter it's set for, and it holds that diameter against the pipe wall as it travels.
That single fact drives everything.
Setting the chain size too large can damage pipe
Chain size is a setting, not a product. A 6" chain set to 4-1/2" is a 4-1/2" chain size — what matters is where the collars are, not what's printed on the box.
So say you set a chain to 4-1/2" and run it in 4" pipe. That chain is fighting the pipe wall for the entire length of the run. In sound pipe you may get away with it. In pipe that's already thin or compromised, you're over-cleaning — cutting into wall you needed to keep.
You're not doing yourself or your customer any favors. The pipe you just cleaned is weaker than the pipe you started with.
Oversized chains cause drag that punishes your equipment
That constant resistance doesn't only load the pipe. It loads the machine.
- The chains drag harder, and the machine works against continuous resistance
- Resistance builds heat, and heat can melt the cable sleeve
- An oversized chain size makes a flex shaft far more likely to flip on the operator
- The whole job takes longer and the result is worse
Correct chain size isn't a trade-off between protecting the pipe and getting work done. It improves both at once. The machine runs freer, the cable lasts longer, and the pipe survives.
Speed is the second lever
Chain size sets the boundary. Speed decides how hard the chain pushes against it.
Higher speed — roughly 2,000–2,500+ RPM. The chains flare harder and hold their shape against the wall. You clean faster, you clean more, and you get a better finished surface. This is where you polish the pipe, and it's what you want for roots and very hard buildup.
Lower speed — 1,500 RPM and below. The chains are more forgiving. They flex rather than holding their set shape rigidly, which makes the whole operation gentler on the pipe and easier on the machine.
Sized correctly, both have their place. Run your initial descale at lower RPM — you're assessing, not finishing, and there's no reason to be aggressive before you know what's under the scale. Lower speed is also how you manage heat on a long run.
The second pass is where speed earns its money. Once you know the pipe is sound and you want a properly finished result, wind it up and polish the pipe.
And here's the part that surprises people. An undersized chain at higher speed can be less damaging than a larger chain run slow. At low RPM the chains bounce inside the pipe. Get the speed up and they stop bouncing and start to float — riding the wall instead of hammering it. That's what lets you hone out a specific section with control rather than beating on it.
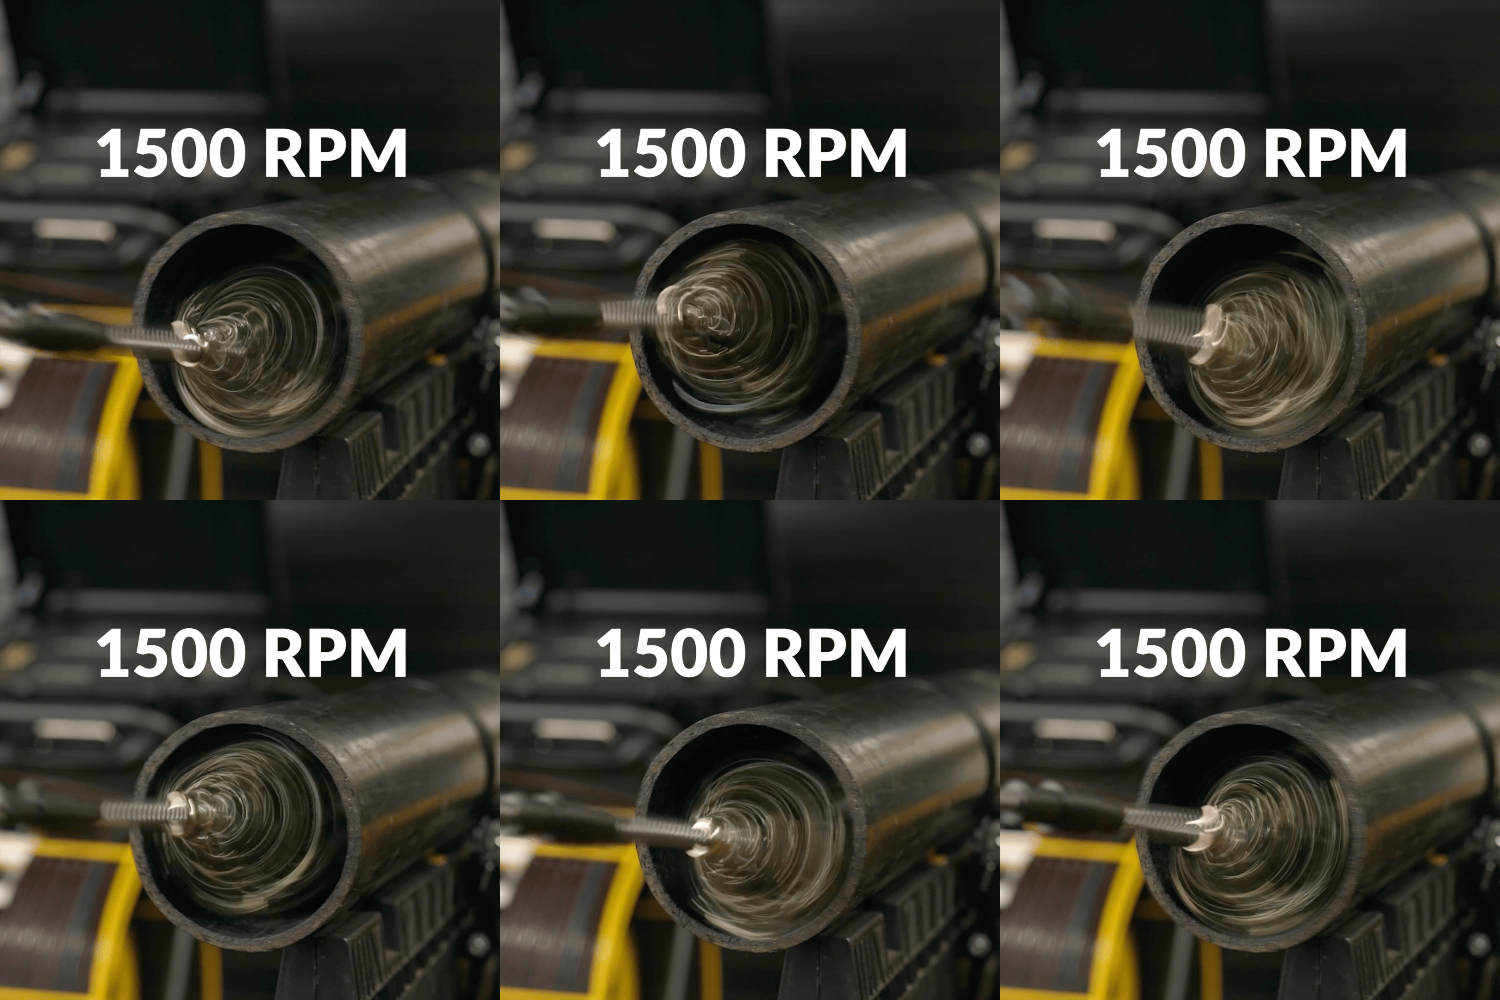
1,500 RPM bouncing
The chains strike the wall and rebound.
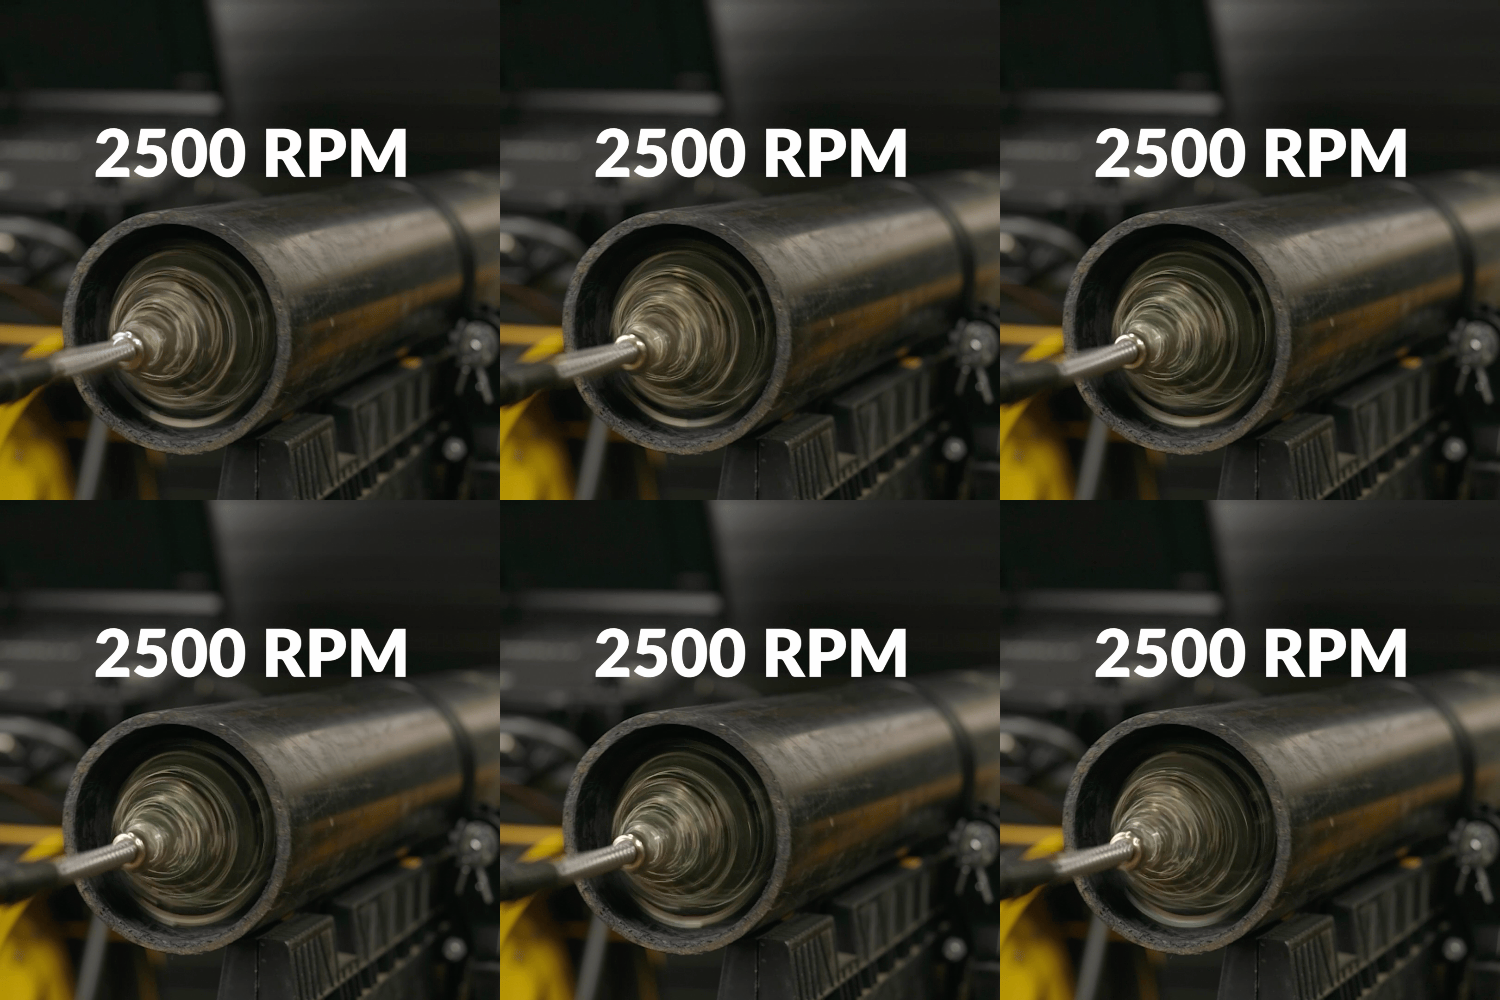
2,500 RPM floating
The chains ride the wall instead of hammering it.
Watch them back to back and you can see why speed isn't simply "more aggressive." It changes how the chain behaves against the wall.
Which is why the dial matters more than the top number. The SpeedCut® Pro has a precision RPM dial, so speed is something you choose for the result you want — not a switch between on and fast.
Where the two levers compound. An oversized chain at high RPM doesn't just clean more — it bites harder. The chain is already fighting to flare past the pipe's diameter, and speed drives it into the wall with more force. That's extra aggressive on the pipe and extra aggressive on the machine, at the same time.
Sizing is the critical decision. Speed works in tandem with it.
Good pipe survives correct descaling
This matters, so it's worth stating plainly: properly sized chain, run by an operator who knows what they're doing, will not damage sound cast iron pipe.
If a pipe breaks during a correctly executed descale, that pipe was already failing. The descale found the failure — it didn't cause it.
That's the honest answer to the question every plumber gets asked before a descaling job, and it's the reason you can quote the work with confidence.
Chain size is measured, not eyeballed
Chain size is set by the position of the two shaft collars on the chain assembly. How far apart those collars sit determines how far the chain flares when it spins up.
Measure it. Every time. Not by feel, not from memory of the last job.

Here's the method, and it's simpler than most people expect:
- Take a ruler or a tape measure.
- Measure from the center of the cable down to the lowest point the chain hangs — including any carbides.
- You want that hang to be half your pipe diameter.
In 4" cast iron, you want the chain hanging 2" from the center of the cable. In 3" pipe, 1-1/2".
Ignore every other measurement. The only thing that matters is the point that will contact the pipe wall.
Diameter and hang are not the same number. Chains are named by diameter, but you measure hang, which is the radius. A 4" chain flares to 4" across, which is a 2" hang. Mixing the two up is how a chain ends up twice the size you intended.
For your first pass, set that hang slightly under half the pipe diameter — the reasoning is in the next section.
Size down, not up
You can take a chain smaller than its nominal size — a 6" chain set to a 2" hang is a 4" chain size, and it works fine. What doesn't work is going the other direction. Pressing the collars in to force a chain past the size it was built for gives you a poor result: the chain doesn't hold the size cleanly and it doesn't cut the way it should. If you need a bigger size, use a bigger chain.
Cyclone chains are a different animal
You cannot adjust the size of a cyclone chain, so the measuring method above doesn't apply.
On speed, the exception is worth knowing: Renssi's square carbide cyclone chains can be run above 1,500 RPM. For every other cyclone chain, our customer feedback points the same direction — keep it at 1,500 RPM or below.
Cyclones are excellent at removing scale, and they're genuinely useful on long runs where managing load matters. Worth understanding what that means on a SpeedCut®: the machine pulls the same load through its 75 ft of onboard cable every time. It's adding extensions beyond that which increases torque and builds heat. That's when keeping the speed down earns its keep.
What cyclones are not is a tool for fine-tuning a clean. When the job calls for control, run an adjustable chain.
The first pass: deliberately under
Here's where technique separates a good descale from an aggressive one.
Set your first pass slightly under half the pipe diameter. In 3" pipe, instead of the full 1-1/2" hang, run closer to 1-3/8". And run it at lower RPM.
You are not trying to strip the full circumference on the first run. You're trying to remove the bulk of the scale and expose enough pipe wall to read its condition — while deliberately leaving a margin so you don't cut into pipe you haven't assessed yet.
You can always take more off. You cannot put wall thickness back.
Then assess — and the job forks
Put the camera back in. What you see determines what happens next, and the two paths are genuinely different jobs.
If the pipe is sound: stop cleaning. This is the part that runs against instinct. On sound pipe — especially older cast iron — you want to leave some scale on the wall. That remaining layer is helping hold the pipe together, and stripping it off buys you nothing. Flush the loosened scale out with a jetter using a flusher or a pusher, and you're done.
Clean to 100% only when the pipe is being lined. A liner will not bond to a pipe that isn't fully clean, so that second pass has a completely different endpoint — you're stripping the wall bare in preparation for the repair, not preserving anything.
Same machine, same cable, entirely different objective. Knowing which job you're on before you start the second pass is what the first pass bought you.
Preset chain sizes and the leader system
Here's the practical problem with everything above: if changing chain size means loosening set screws, repositioning collars, re-measuring and reassembling on a job site, most operators won't do it. They'll run whatever's on the shaft and accept the compromise.
The fix is to stop treating chain changes and chain sizing as the same task.
With a spring-loaded SpeedConnector on the end of the SpeedShaft® cable, each chain size lives on its own leader, preset and measured back at the shop. Changing size on the job means swapping to a different leader — it snaps together in seconds — rather than rebuilding a chain assembly on site.
Your second pass becomes a swap, not a rebuild. Which means you'll actually do it.
| Chain size | Typical pipe | Configuration |
|---|---|---|
| 2" | 2" pipe | Runs bare on the cable — remove the SpeedConnector |
| 3" | 3" pipe | 10" leader with female SpeedConnector end |
| 4" | 4" pipe | 10" leader with female SpeedConnector end |
| 6" | 6" pipe | 10" leader with female SpeedConnector end |
Realistically, most descaling work lands in the 3" to 4" range with some 6".
The 2" exception is worth explaining. The SpeedConnector adds profile, and in 2" pipe that extra bulk can make navigation more difficult. So for 2" work, take the connector off and run the chain directly on the cable. Less convenient, better result — and in 2" pipe the result is what matters.
At 3" and up, there's no downside. Keep the connector on. The SpeedConnector is a convenience, not a requirement — you can always put chains right on the cable.
The cable and the machine
Everything above assumes your equipment cooperates. A lot of it doesn't.
Flex shaft cable is usually a compromise. A cable flexible enough for small-diameter work tends to struggle in main lines. A cable stiff enough for mains won't navigate the small stuff. Most plumbers end up either owning two or accepting that half their work is a fight.
SpeedShaft® is built to hold up across 2" through 6" pipe — sturdy enough for main line work without giving up small-diameter capability.
Anti-flip matters more than it sounds. Under high torque, a conventional flex shaft cable wants to flip on the operator. It's the failure every descaling operator recognizes and nobody enjoys. SpeedShaft® is built strong enough that it doesn't want to flip on you when you're really leaning into a run. No cable is indestructible — but this one isn't fighting you the whole way in.
It runs on a standard outlet. The SpeedCut® Pro reaches 3,200 RPM around 15 amps — no generator, plug into any residential or commercial outlet.
It takes standard 3/8"(10mm) tooling — but the cable itself is custom. SpeedShaft® is purpose-built for high-speed drain cleaning. It looks familiar at a glance, but it isn't an off-the-shelf cable and it isn't interchangeable with one — it's made this way because that's what performs at descaling speeds.
What you do get is an open tool end. 3/8"(10mm) is the standard size for high-speed drain cleaning tooling, so you can run cutters and accessories on a leader, or pull the SpeedConnector off and mount tooling directly on the cable. You're not locked into one manufacturer's attachments.
You can fix it in the field. Self-serviceable by design. A cable repair shouldn't mean shipping a machine across the country and losing three weeks of work.
Built in the USA.
Finishing the job: clearing what you knocked loose
The descale isn't finished when the scale is off the wall. It's finished when the debris is out of the line.
Everything a chain knocker removes is now sitting in the pipe. Left there, it settles downstream and you've traded one blockage for another. Jetting is how you clear it:
- Pushers move heavy debris down the line ahead of the nozzle
- Flushers carry the loosened material back out
Match the nozzle to your jetter's actual flow and pressure, not to the job description. Use nozzles that work best for your hydro jetter so you don't leave material behind you'll be called back for.
What this work takes
- A camera before and after
- You can't assess a pipe you can't see, and the after-inspection is what turns a cleaning job into a documented recommendation. For descaling work the MiniFlex Cam36 is the right call — a mini mainline camera covering 2"–6" with a 115 ft reel. The MiniFlex Cam19 is a micro camera for 1-1/2"–4" and smaller-diameter work.
- A machine matched to the pipe range
- SpeedCut® Pro covers 2"–6" with up to 150 ft of reach. The Mini+ covers 2"–6" up to 125 ft. Both run the SpeedShaft® cable and SpeedConnector.
- Chain sizes preset on individual leaders
- Measured in the shop, so sizing decisions on the job take seconds.
- A jetter and the right nozzles
- To clear what you knocked loose.
Common questions
Will descaling damage cast iron pipe?
Correctly sized chain will not damage sound cast iron pipe. If a pipe fails during a properly executed descale, it was already compromised — the descale revealed the failure rather than causing it. Damage risk comes from oversized chain size, which forces the chain against the pipe wall for the length of the run.
How do I know what chain size to use?
Measure from the center of the cable to the lowest point the chain hangs, including any carbides. That hang should be half your pipe diameter — 2" of hang for 4" pipe. Set slightly under that for your first pass, assess the pipe, then size up if the job calls for it. You can size a chain down below its nominal size, but don't force it larger. Cyclone chains can't be adjusted at all; Renssi's square carbide cyclones can run above 1,500 RPM, while other cyclone chains should be kept at 1,500 or below.
Why not just remove all the scale on the first pass?
Because you don't yet know what's under it. The first pass is diagnostic — it exposes enough pipe wall to judge the pipe's condition while leaving margin. And if the pipe turns out to be sound, you should leave some scale on it: on older cast iron that remaining layer helps maintain the pipe's integrity. Clean to 100% only when the pipe is being lined, because a liner won't bond to a pipe that isn't completely clean.
Can you descale 2" pipe?
Yes. Run the 2" chain size directly on the cable with the SpeedConnector removed — the connector's added profile makes 2" pipe harder to navigate. At 3" and above, keep the connector on.
Do you need a generator to run a descaling machine?
Not with the SpeedCut® Pro. It reaches 3,200 RPM around 15 amps, so it runs off a standard residential or commercial outlet.
How much does pipe descaling cost?
There's no flat rate, because no two cast iron lines are the same job. What drives the cost: pipe diameter and line length; access, since a ground-level cleanout is a different job from a roof vent; how heavy the scale is; the number of passes, which you can't know until the camera shows you; camera inspection before and after; debris removal and jetting time; and pipe condition — if the line needs lining, the descale becomes prep work for a larger repair.
For contractors quoting this work: the pass count and the pipe's condition are the two variables you can't know until you're in the line, which is why the camera inspection earns its place in the estimate.
Ready to descale properly?
Talk to us about your pipe range and the work you're taking on. We'll tell you what you actually need — and if that's not our machine, we'll tell you that too.
